Let’s talk about optimizing Arnold’s render settings to bring down rendering time considerable (at least if you compare vs. renderers like Luxrender, Indigo, or Maxwell). Basically there are three things you should know about:
-
AOVs: AOV stands for Arbitrary Output Variables and is explained for example in Pixar’s RenderMan application notes.
-
The recommended noise reduction workflow (see image below and link to Solid Angle’s support documentation).
-
Why using a mesh_light node might be preferable over using the emission parameters of e.g. the standard material shader.
There is another post about AOVs, but basically it allows you to split the different contributions to the beauty image into several parts:
options
{
...
 outputs 7 1 STRING

  "RGBA RGBA filter driver"
  "direct_diffuse RGB filter driver_direct_diffuse"
  "direct_specular RGB filter driver_direct_specular"
  "reflection RGB filter driver_reflection"
  "refraction RGB filter driver_refraction"
  "indirect_diffuse RGB filter driver_indirect_diffuse"
  "indirect_specular RGB filter driver_indirect_specular"
...
}
...
gaussian_filter
{
 name filter
}

driver_exr
{
 name driver
 filename "arnold.exr"
}

driver_exr
{
 name driver_direct_diffuse
 filename "arnold_aov_direct_diffuse.exr"
}
...
Theoretically you could write to a single OpenExr file by specifying exactly the same name for (and path to) a filename (e.g. “arnold.exr”) within the different driver_exr nodes, but I prefer to write to separate files.
As mentioned before, there is a more complex noise reduction workflow you should look at, but for now lets focus on a simplified version:
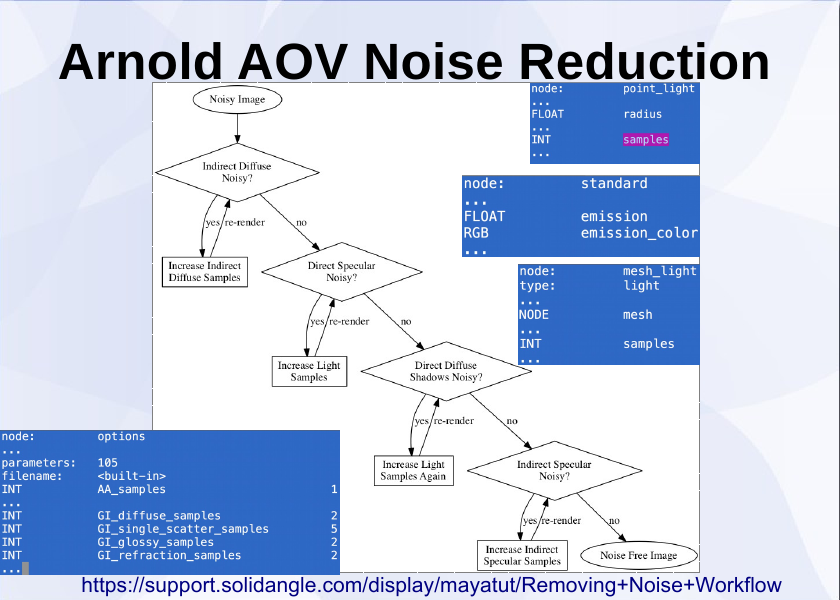
Basically you try to go step by step from a noisy image on the upper left to a noise free (or optimized) version on the lower right. There are decisions to make by looking at the resulting AOV images (e.g. the indirect diffuse) and knowing what parameters to optimize. For example the first and last decision in the simplified workflow above tell you to increase either the diffuse or specular samples. They are part of the global options node:
options
{
...
GI_diffuse_depth 0
GI_glossy_depth 0
...
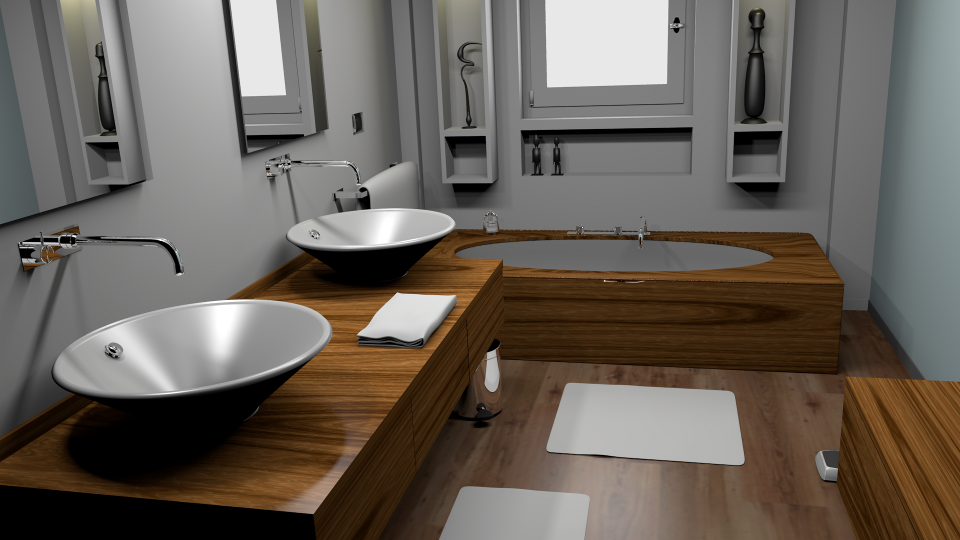
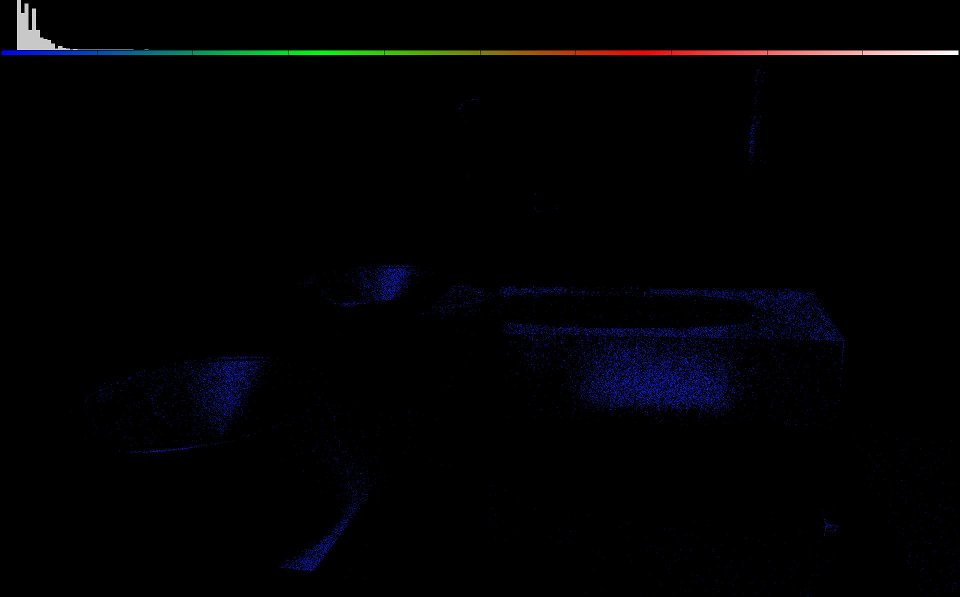
}First we are only interested in direct lighting, which means that we don’t allow any diffuse or specular (glossy) bouncing by setting the parameters above to zero. This is the resulting image after optimizing the individual light samples:
To be able to tweak sample settings in the scene above we have to use a mesh_light node for each light emitting geometry. The reason for that is, that for example the standard material (which could be used alternatively) has emission settings, but does not provide a samples parameter.
...
polymesh
{
 name MEmirror_emit
...
 shader "MAmirror_emit_mat"
 opaque on
}
...
mesh_light
{
 name MAmirror_emit_light
 mesh "MEmirror_emit"
 color 1 1 1
 intensity 14
 samples 2
}
...
So what I did first was to turn each mesh_light node off (by setting intensity to zero), except one (which I intended to find good sample values for). Comparing with a renderer (like Luxrender) which supports light groups might help in this case. I ended up with these values by raising the intensities and samples for each light source independently (this is the output of diff, which I stored as a .patch file in the repository):
9c9
<  AA_samples 5
---
>  AA_samples 3
...
501285,501286c501285,501286
<  intensity 14
<  samples 2
---
>  intensity 1400 # 14
>  samples 6
675489,675490c675489,675490
<  intensity 10
<  samples 2
---
>  intensity 200 # 10
>  samples 4
675525,675526c675525,675526
<  intensity 4.5
<  samples 2
---
>  intensity 450 # 4.5
>  samples 4
675559,675560c675559,675560
<  intensity 2
<  samples 2
---
>  intensity 200 # 2
>  samples 3
675593,675594c675593,675594
<  intensity 14
<  samples 2
---
>  intensity 1400 # 14
>  samples 5
Having found good parameter values for each individual mesh_light the next step would be to allow bouncing of the diffuse materials (to have proper global illumination) but to limit the number of times light bounces off diffuse materials to something reasonable (again, comparing e.g. against Luxrender might help). I decided to let the diffuse lighting bounce twice (otherwise some shadow areas might be too dark).
options
{
...
GI_diffuse_depth 2
...
GI_diffuse_samples 15
...
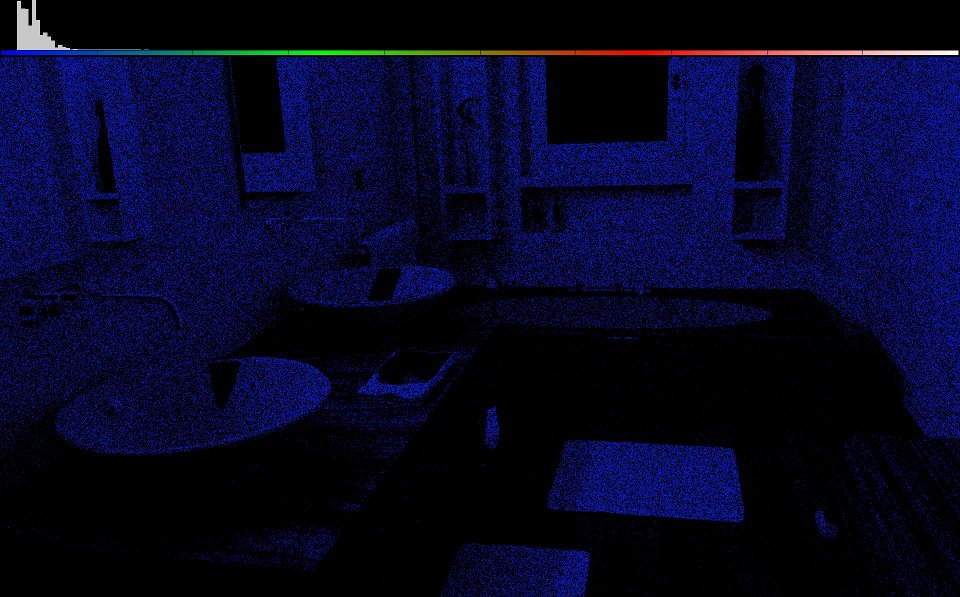
}To find a good value for GI_diffuse_samples I started low (e.g. three) and step by step increased that value until I was satisfied. I use imf_diff from mental ray to compare the results from a previous render to the increased quality (using false colors to emphasize the differences):
So far we didn’t allow the specular materials to bounce light:
options
{
...
GI_diffuse_depth 2
GI_glossy_depth 0
...
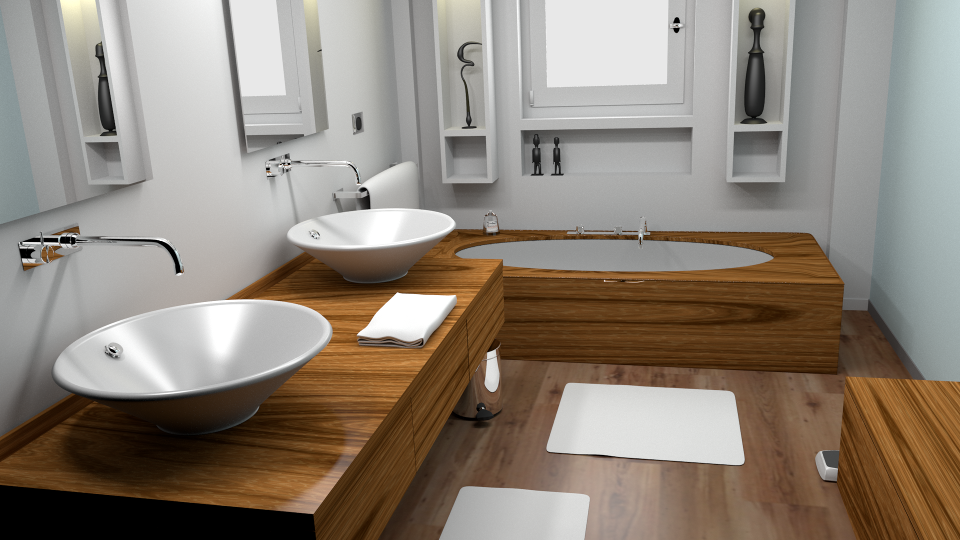
}And here is the result after tweaking the diffuse lighting:
The final task was to find good values for GI_glossy_samples and using imf_diff again to watch the differences while doing so:
You can for example write to different OpenExr files for the indirect specular AOV and compare different GI_glossy_samples values until you are satisfied:
The options parameters I ended up with are:
options
{
...
 AA_samples 3
...
 GI_diffuse_depth 2
 GI_glossy_depth 1
...
 GI_diffuse_samples 15
...
 GI_glossy_samples 9
...
}
An additional trick I use is to render 4 different runs of the same scene with different seeds and combine the resulting images into an even less noisy image (because the different seeds lead to different noise patterns and get averaged). The rendering gets automated by Makefiles (like this):
# usage:
# make clobber
# make -j 4

ARNOLD = /usr/local/Arnold
KICK = $(ARNOLD)/bin/kick

all: \
salle_de_bain_seed_1.exr \
salle_de_bain_seed_2.exr \
salle_de_bain_seed_3.exr \
salle_de_bain_seed_4.exr

# patch

salle_de_bain_patched.ass: salle_de_bain.ass
	patch salle_de_bain.ass -i salle_de_bain.patch -o salle_de_bain_patched.ass

# 4 seeds

salle_de_bain_seed_1.exr: salle_de_bain_patched.ass
	$(KICK) -dp -dw -i salle_de_bain_patched.ass -o salle_de_bain_seed_1.exr \
-set options.AA_seed 1 -v 6

salle_de_bain_seed_2.exr: salle_de_bain_patched.ass
	$(KICK) -dp -dw -i salle_de_bain_patched.ass -o salle_de_bain_seed_2.exr \
-set options.AA_seed 2 -v 6

salle_de_bain_seed_3.exr: salle_de_bain_patched.ass
	$(KICK) -dp -dw -i salle_de_bain_patched.ass -o salle_de_bain_seed_3.exr \
-set options.AA_seed 3 -v 6

salle_de_bain_seed_4.exr: salle_de_bain_patched.ass
	$(KICK) -dp -dw -i salle_de_bain_patched.ass -o salle_de_bain_seed_4.exr \
-set options.AA_seed 4 -v 6

# TODO: combine 4 seeds into beauty
On my Linux machine that 4 images rendered in less than 15 hours in 1920x1080 resolution, whereas the same quality might take double (or even longer) for other renderers. A single seed alone (which might be already good enough quality-wise) renders with Arnold in less than 3 hours.
Feel free to download the scene and make your own tests:
- Name: Salle de bain
- Author: nacimus
