We keep the art gallery scene (with a small lobby entrance and a showroom) - see chapter 3.5 of the Rendering with Radiance book - in various formats in a repository.
Once we exported the scene (after importing Radiance files into Blender) via the export-multi script, we store the resulting .ass file in the repository.
To create variations of that scene we keep patches for each camera perspective and sometimes two versions (one for a daylight, one for a night time scene of the same camera perspective). In the screenshot above you see two patches for camera 01. The patches get applied by a Makefile like this:
...
# art_gallery_01

art_gallery_01.ass: art_gallery_01.patch
	patch art_gallery.ass -i art_gallery_01.patch -o art_gallery_01.ass
...
# art_gallery_01n

art_gallery_01n.ass: art_gallery_01n.patch
	patch art_gallery.ass -i art_gallery_01n.patch -o art_gallery_01n.ass
...
We will focus on the daylight scene and look at the patch creating a slightly modified .ass file to render:
10c10,11
<  AA_samples 16
---
>  AA_samples 3
>  AA_seed 1
24c25
<  camera "CAcam02"
---
>  camera "CAcam01"
27,32c28,36
<  GI_diffuse_depth 3
<  GI_glossy_depth 1
<  GI_reflection_depth 6
<  GI_refraction_depth 6
<  GI_total_depth 12
<  GI_diffuse_samples 3
---
>  GI_diffuse_depth 2
>  GI_glossy_depth 0
>  GI_reflection_depth 2
>  GI_refraction_depth 2
>  GI_total_depth 10
>  GI_diffuse_samples 4
>  GI_single_scatter_samples 5
>  GI_glossy_samples 2
>  GI_refraction_samples 2
166c170
<  intensity 1
---
>  intensity 10
176a181
>  samples 4
363611c363616
<  emission 1
---
>  emission 0 # 1
364319c364324
<  emission 1
---
>  emission 0 # 1
365124c365129
<  emission 1
---
>  emission 0 # 1
368095c368100
<  emission 1
---
>  emission 0 # 1
368329c368334
<  emission 1
---
>  emission 0 # 1
369294c369299
<  emission 1
---
>  emission 0 # 1
370645c370650
<  emission 1
---
>  emission 0 # 1
371106c371111
<  emission 1
---
>  emission 0 # 1
For Arnold it’s very important to keep the AA_samples down, therefore we use a value of 3 instead of 16. We will talk about AA_seed a bit later. The next couple of parameters belong all to the options node. First we specify which camera to use (the .ass file can contain more than one camera), then we make sure to explicitly specify all options parameter which start with the prefix GI_. We will talk about the individual values being used later. Let’s delay the discussion of intensity and samples as well, and talk about the lines regarding emission first. In the resulting patched .ass file we can see that they are part of a standard shader node, e.g.:
standard
{
 name ...
 emission 0 # 1
 emission_color 1 1 1
 ...
}
So, basically, we turn off all light emitters, except the sun and sky.
Let’s talk about AOVs now. AOV stands for Arbitrary Output Variables and is explained for example in Pixar’s RenderMan application notes. But how do we create frame buffers for Arnold? Let’s look into the .ass file again:
options
{
...
 outputs 7 1 STRING

  "RGBA RGBA filter driver"
  "direct_diffuse RGB filter driver_direct_diffuse"
  "direct_specular RGB filter driver_direct_specular"
  "reflection RGB filter driver_reflection"
  "refraction RGB filter driver_refraction"
  "indirect_diffuse RGB filter driver_indirect_diffuse"
  "indirect_specular RGB filter driver_indirect_specular"
...
}
...
gaussian_filter
{
 name filter
}

driver_exr
{
 name driver
 filename "arnold.exr"
}

driver_exr
{
 name driver_direct_diffuse
 filename "arnold_aov_direct_diffuse.exr"
}
...
Basically seven framebuffers get created and they all use a common gaussian filter, but write to individual OpenExr image files. So, let’s look at two of them, which visualize the direct and indirect diffuse AOVs:
On the left you see light coming from the sun (very strong) hitting parts of the floor and leaving a white spot of light. The remaining light comes from the sky, which is blueish and the direct diffuse buffer only shows light which enters the room through the glass doors or windows and hit the floor or walls directly, no bounce light gets stored in this buffer. The indirect diffuse buffer gathers all the bounce light (after the first hit). To be more precise: Both buffers deal only with the diffuse part of the bounced light, which basically emits in a hemi-sphere around the surface normal of the hit geometry.
The options parameter GI_diffuse_depth tells Arnold how many bounces are allowed before the renderer stops following this ray path. In this case a value of two is enough to make the light bounce off the floor (first bounce) and off the next object the reflected rays hit (second bounce). The parameter GI_diffuse_samples helps to reduce noise in the indirect diffuse buffer, see noise workflow and other options parameters.
What’s missing in our discussion are the two patched values for intensity and samples. Let’s show them in the context of the nodes they belong to:
...
physical_sky
{
 name sun_sky
 turbidity 2
 elevation 73.9559555
 azimuth -76.0981598
 sun_direction 0 1 0
 intensity 10
 X 1 0 0
 Y 0 0 1
 Z 0 1 0
}

skydome_light
{
 name sun_skydome
 color sun_sky
 intensity 1
 samples 4
}
...
The skydome_light node can be used to either light the scene with a single colored surrounding sphere, or texture that sphere e.g. by a HDR image (for image based lighting), or we can use the physical_sky node instead of an image to create a sun and sky simulation based on some parameters. In our case we tweaked the intensity value, which made the sun bright enough to paint the spot on the floor white, but not too bright, so we can see the outside ground material being greyish. The choosen samples value removes noise in the direct diffuse buffer.

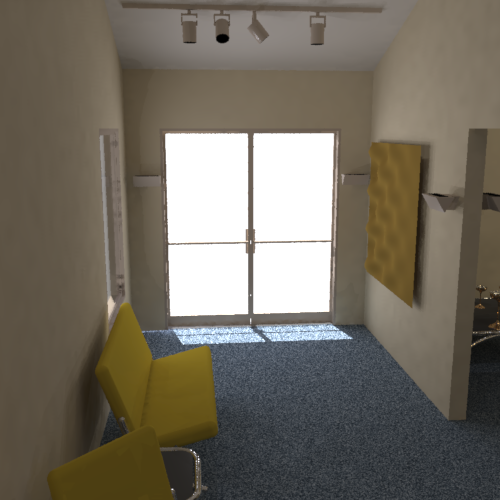
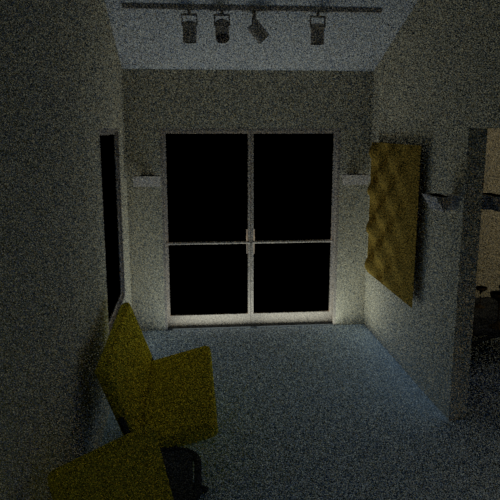
Rendering directly with the choosen patches in a 500x500 resolution would still render pretty fast (in about 1 minute 10 seconds), but results in a very noisy image (see above on the left side).
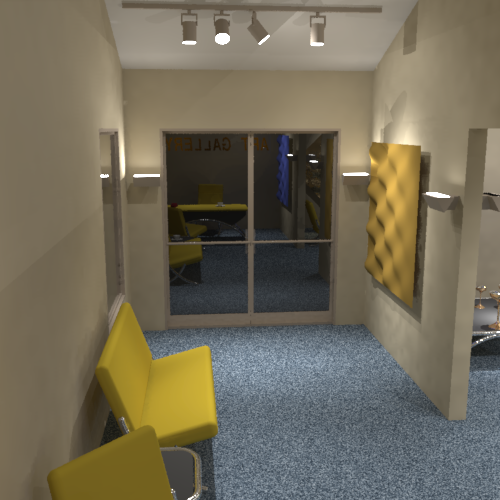
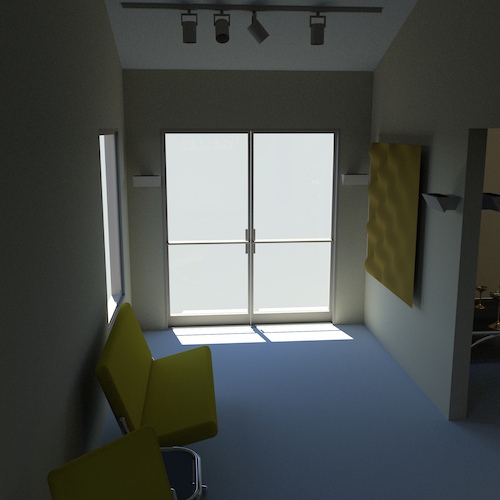
To end up with the far less noisy image on the right we used a trick to render first in a higher resolution (2000x2000), and second we merged 4 images of that resolution which used four different seed (AA_seed) values:
...
# art_gallery_01

art_gallery_01.ass: art_gallery_01.patch
	patch art_gallery.ass -i art_gallery_01.patch -o art_gallery_01.ass

art_gallery_01.exr: \
art_gallery_01_seed_1.exr \
art_gallery_01_seed_2.exr \
art_gallery_01_seed_3.exr \
art_gallery_01_seed_4.exr
	echo "TODO: combine seed images into a single one"

art_gallery_01_seed_1.exr: art_gallery_01.ass
	$(KICK) -dp -dw -i art_gallery_01.ass -o art_gallery_01_seed_1.exr \
-set options.AA_seed 1 -r 2000 2000 -v 0

art_gallery_01_seed_2.exr: art_gallery_01.ass
	$(KICK) -dp -dw -i art_gallery_01.ass -o art_gallery_01_seed_2.exr \
-set options.AA_seed 2 -r 2000 2000 -v 0

art_gallery_01_seed_3.exr: art_gallery_01.ass
	$(KICK) -dp -dw -i art_gallery_01.ass -o art_gallery_01_seed_3.exr \
-set options.AA_seed 3 -r 2000 2000 -v 0

art_gallery_01_seed_4.exr: art_gallery_01.ass
	$(KICK) -dp -dw -i art_gallery_01.ass -o art_gallery_01_seed_4.exr \
-set options.AA_seed 4 -r 2000 2000 -v 0
...
After that we scaled the resulting image down to a 500x500 resolution.
